
Welcome to the P600 printer and ink testing project. We will be adding additional relevant information to this article as we acquire it, and eventually linking it to an even more detailed PDF report on the project as well. Updates to this article will also be announced on the Aardenburg Imaging homepage as they occur.
There are now many reviews of the SureColor P600 online. The majority of these reviews were conducted using early-release units loaned in advance so that the reviewer could evaluate the product in time for the official release of the equipment to dealers. That’s a good thing, but on the downside the loan period is often fairly brief, so those reviews also tend to focus on the “what’s new” features claimed by the manufacturer without really having the time to fully explore the printer functionality in every aspect that would be of importance to potential buyers. What we will try to do for the photography and printmaking community is to get deeper into these nuts and bolts, but that effort does take time. Hence, our efforts will unfold over the next several months, and this article will be updated periodically to reflect what we discover as we work more with this new printer and its new and improved ink technology. A primary objective is, of course, to test the lightfastness of the new ink set on various media. There are only a few labs in the world that perform this type of print permanence testing, and Aardenburg Imaging is one of them. However, I will also try to give some printer functionality and image quality insights as I discover them.
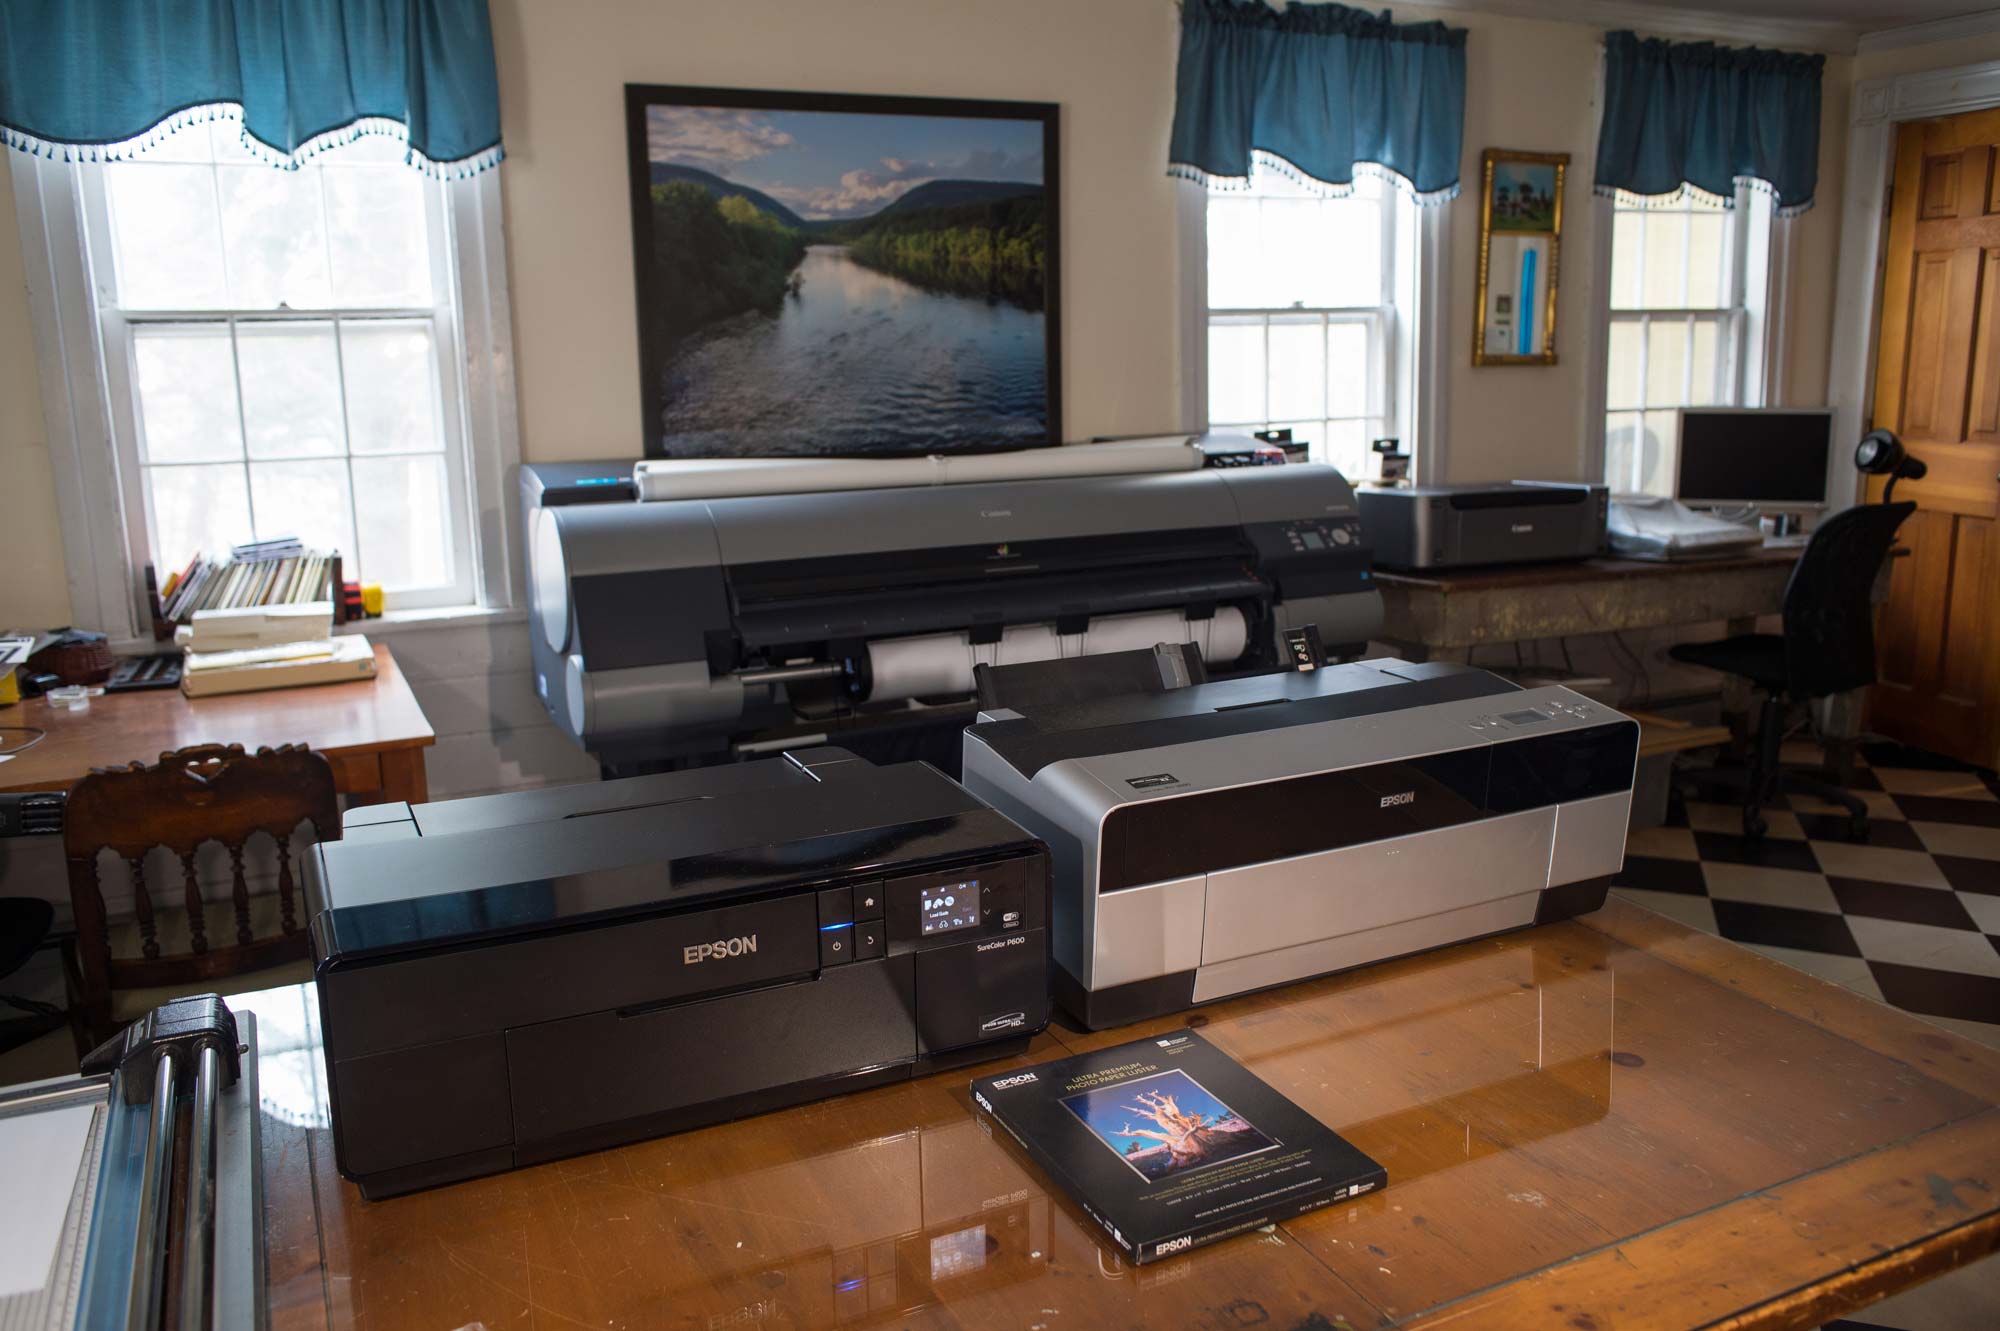
To get things started now that I’ve had a chance to set up and begin printing with the new SureColor P600, let’s talk about some first impressions. First, How big is this printer? The following two photos hopefully show what many space-constrained photographers seem to be asking about on various forums, ie., How big is the SureColor P600 printer that handles 13 inch wide media compared to the older Epson Stylus Pro 3880 that can print on 17 inch wide media?
The Epson Surecolor P600 Printer (in the foreground on the left) can print up to 13 inch wide media. The older Epson Stylus Pro 3880 (in the foreground on the right) can print up to 17 inches wide. When their trays are closed they displace a very similar amount of table space.
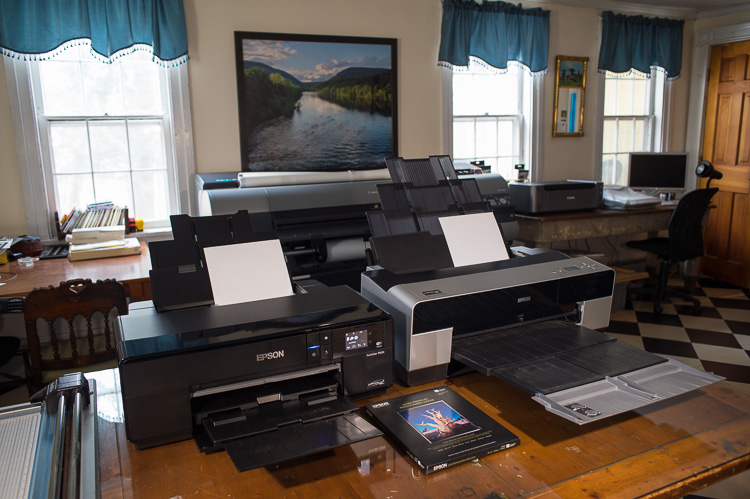
The Epson 3880 easily reveals its larger 17″ wide media capability when the printer trays are fully opened.
Printer Size and Weight….
The shipping weight of the P600 was 44 lbs (20Kg). After removal from the shipping box, I weighed the P600 printer at 33.5 lbs. I also weighed my Epson 3880, and unboxed (I no longer have its shipping materials) the 3880 weighed 44 lbs. So, if you can lift the P600 shipping box by yourself you can also move an unboxed and larger 17″ Epson 3880 printer, but the 3880 is definitely ten pounds heavier than the P600. Although the UPS driver had no trouble transferring the P600 container to my side porch by himself, and I had no trouble transferring it inside, unboxing the unit and setting it up, I think it is fair to say that some folks of smaller stature or not accustomed to lifting relatively heavy boxes may want to have another person on hand to help when the P600 is initially lifted out of it’s shipping box and placed on a table or cart.
Pretty much any table or roll-away cart you would use to hold a P600 will also hold a 3880. When in use, you may want to pull both printers away from the wall a bit, the 3880 slightly more so, but I just don’t see any real size advantage to the 13 inch inkjet printer class compared to the 17 inch 3880. The physical size of the P600 is pretty much what one should expect from an inkjet printer with a 13 inch carriage width. In contrast, the 3880 is a small office marvel when it comes to size of printer versus maximum size of print, especially when compared to other 17 inch inkjet printers on the market today. That said, the 3880 has been available for a few years, and as I write these words (April 14, 2015) Epson has just announced a new model, the SureColor P800, which appears to be the logical successor to the Epson 3880. The P800 is a small footprint 17” model that uses the new UltraChrome HD ink set just like the 13″ P600 model. I haven’t seen the full spec sheet yet. It will be interesting to see if the P800 matches the variable drop size minimum of 2 picoliters that the P600 delivers or whether it utilizes a larger overall drop size at the expense of maximum image resolution in order to boost overall print speed.
Dmax Improvements….
Epson claims significantly improved Dmax with the new Utrachrome HD inkset. We will be evaluating this claim in significantly more detail, but for now, I made a quick check on Epson Premium Luster paper, a typical RC photo type paper that uses the PK black ink and on the Hahnemuhle Photo Rag Pearl fine art paper we will be using in the light fastness testing. HNPHRagPearl is an outstanding third party fine art paper in the “traditional fiber base photo” category. The PK black ink is recommended, and interestingly enough, Hahnemuhle also recoommends the Premium Luster media setting in the P600 driver as the preferred media setting when printing on HNPHRagPearl. For all measurements reported below, I used the generic vendor suppled ICC profiles and their associated (i.e., recommended) driver settings.
Here are the maximum black levels achieved with both papers for the P600 compared to the Epson 3880 output. Values were averaged from several measurements across each print.
P600/Epson Ultra Premium Luster/5760 dpi: Dmax = 2.36 L*min = 3.9
Epson 3880/Epson Ultra Premium Luster/2880 dpi: Dmax = 2.18 L*min = 6.0
On Premium Luster paper, the P600 did show superior Dmax compared to the Epson 3880, but the color difference between these two values is only a ∆L* of 2.1, not enough to be easily noticeable to the average viewer when in the context of a complex photographic image.
P600/HNPHRagPearl/1440 dpi: Dmax = 1.95 L*min = 9.9
Epson 3880/HNPHRagPearl/2880 dpi: Dmax = 1.80 L*min = 13.2
Epson 3880/HNPHRagPearl/2880 dpi/coated* Dmax = 1.90 L*min = 11.1
* 2 coats of PremierArt Print Shield Spray.
On the HNPhRag Pearl media, the uncoated print results get more interesting. ∆L* of 3.3 starts to become just barely noticeable to a discerning viewer when in the context of a complex photographic imagery, but wait there’s more!…
Hahnemuhle recommended a 1440 dpi setting for its supplied ICC profile. The print quality was excellent, but upon very close inspection I noticed a slightly courser stocastic screen pattern (dot structure) in some highlights and midtones on the print compared to the results I had seen on the Premium Luster paper when it was printed at 5760 dpi. So, I decided to make another print at 5760dpi. I expected some color and tonal errors because this output resolution wasn’t the recommended setting for that ICC profile, but I wanted to see if the apparent “graininess” in those highlight and midtown color patches would improve. To my surprise, color was still commendably accurate, dot structure did improve, but now compare the Dmax result at the higher output resolution!
P600/HNPHRagPearl/5760 dpi: Dmax = 2.19 L*min = 5.9
P600/HNPHRagPearl/1440 dpi: Dmax = 1.95 L*min = 9.9
Epson 3880/HNPHRagPearl/2880 dpi: Dmax = 1.80 L*min = 13.2
The higher output resolution significantly altered the obtainable DMax by a ∆L* value of 3.0 compared to the 1440 dpi result, and thus achieved a very healthy and clearly noticeable 8.1 ∆L value when comparing the P600 result to the Epson 3880 result on this paper. This result needs further exploration. First, does the 1440 dpi output resolution lead to generally inferior Dmax values on the P600 with PK black, or is this an annomally of the Hahnemuhle supplied profile? Second, the new PK ink does indeed deliver a DMax improvement as claimed by Epson, but it also appears to be media dependent. Some media will benefit more significantly than others. We should explore both of these initial results in more detail as the the project progresses.
And for good measure, here’s the P600 result for HNPHRag Pearl compared to results obtained on a Canon iPF8300 printer using Canon’s Lucia EX pigment ink set.
P600/HNPHRagPearl/5760 dpi: Dmax = 2.19 L*min = 5.9
Canon iPR8300/HNPHRagPearl/highest quality: Dmax = 2.04 L*min = 8.3
Canon iPR8300/HNPHRagPearl/highest quality/coated*: Dmax = 2.26 L*min = 5.0
* 2 coats of PremierArt Print Shield Spray.
I haven’t tried coating any prints made with the P600 yet, so it’s premature to say if coating will increase DMax with the new PK ink. Hopefully it will. More testing needed.
HNPhRagPearl is a favorite paper of mine, but due to the poorer Dmax results on the 3880 compared to my Canon iPF 8300, I never use it on the Epson 3880. I always move the job to the iPF 8300 even though for smaller prints, the Epson 3880 has a subtle advantage over the much bigger iPF 8300 in terms of output resolution and screening pattern smoothness. What we can conclude in these results is that the new Epson UltraChrome HD ink set now brings DMax parity with the Canon Lucia EX ink set to the Epson platform that isn’t quite there with the older Epson K3 ink set, at least when printing on this favorite paper of mine. If lightfastness also meets or exceeds (to be determined) the Canon Lucia EX pigment set then the Ultrachrome HD inks will be definitely worth an upgrade for owners of older Epson printer models, IMHO, particularly as wider format Epson printer models using this new HD ink set reach the market.
In the next update to this article, I should be able to add some DMax results using the Ultrachrome HD MK black ink and place all of this data into an easier-to-read table format. Michael Reichmann thought that use of the new UCHD MK black on matt papers showed even more merit than the PK black in his P600 printer review you can read over at the Luminous Landscape website. The results shown above for PK black do support Epson’s claims for improved DMax. It will be interesting to evaluate the MK black ink performance as well.
April 16, 2015 – The Epson WaterColor Paper Textured 17×22″ cut sheet arrived today.
Test target samples of the Exhibition WaterColor paper will be prepared for light fade testing soon after the samples made with Hahnemuhle Photo Rag Pearl have been completed. EISA (Epson ink switching Anxiety ;-)) precludes me from preparing both sets of test samples at the same time. I want to be sure I’ve got all the PK samples made on both the Epson 3880 and the P600 before committing the P600 to its first MK black ink switch and switching over the Epson 3880 as well.

Epson Exhibition WaterColor Paper Textured, shown here in its cut sheet 17×22″ packaging. Kudos to Epson’s packaging designers who chose a cardboard sink matt surrounding the PP (polypropylene) clear-bagged media in order to eliminate the all-too-common problem of dinged corners. Receiving expensive fine art media with dinged corners is pretty frustrating.
I routinely order 17×22 inch paper for use with my Epson 3880. However, there are other reasons to purchase this bigger sheet size even for a smaller 13″ desktop printer like the Epson P600 or the Canon Pro 1,10, or 100 series printers. A 17×22 tabloid-size sheet divides perfectly into 4 US letter-size sheets with no trim waste, and depending on the vendor and choice of media, this approach can sometimes (but not always) lead to significant savings rather than purchasing a comparable quantity of letter-size media. For example, I paid $136.18 with free shipping from B&H Photo in NYC for the 25 sheet box of 17×22 Epson Exhibition WaterColor Paper textured media shown in the photo above. It can be used to make up to 100 letter-size sheets. Four 25 sheet letter-size packages of the same paper would have run $49.00 per package for a total cost of approximately $196. Quartering the larger sheets into letter size sheets doesn’t take much effort with a decent paper trimmer, so that $60 savings is worth a little extra effort to cut the larger sheet to my desired size. Moreover, I can cut the occasional 13×19 sheet from the 17×22 sheet when I need to, also 11×17 size for double-folded use in hand made books, and also a 14×20 (up to 22) sheet for use with my Canon Pro-100 printer when I want more ample margins on the print. The nominally 13″ class Canon Pro series printers have a novel feature in that they can accept 14 inch wide media through the rear manual feed tray.
Clogs and Cleaning Cycles
![]()
This datalogger sitting on top of the P600 is tracking temperature and humidity in 15 minute intervals, but it can also timestamp an event. We will timestamp the event whenever the printer requires a cleaning cycle. FWIW, we have noted that the new SureColor P600’s cosmetic use of shiny black plastic over large areas and particularly on the top horizontal surface looks very attractive, but it is incredibly prone to scratches and abrasion. Our one week old P600 already is showing a few scratches!
Many Epson printer users believe clogging is related to low humidity, but this may be more myth than fact. What does appear to be good anecdotal information is that some Epson printers seem to be much more prone to clogging than others. Each printer’s capping station should for all practical purposes keep the head in a moist microclimate when not in use, so humidity in the room environment may not show any correlation with clogging events. The Aardenburg Imaging print lab, like many interior rooms in a cold Northeastern USA climate, goes to low relative humidity in the winter months, but cycles back up to moderate and moderately high humidity in the summer months. Additionally, some clogs may also be air bubbles in the ink delivery system, and such an occurrence can also demand a cleaning cycle to overcome the problem. In any case, I will log each and every time Aardenburg Imaging’s P600 requires a head cleaning. I’m also going to try to keep a detailed print frequency and quantity log, and I will publish temp/humidity statistics in due time. We have only one P600 to test, and this one unit may or may not be representative of the typical P600 performance, but one never knows what will be discovered until one does the experiment.
So far, no cleaning cycles have been needed, but this print log is just getting started!
April 17, 2015: Uh, Oh, I spoke too soon….Stealth cleaning cycles on my P600.
Well, isn’t this a classic case of Murphy’s Law? After I finished updating this post yesterday, I turned the P600 on after it had been sitting (turned off) for 2-3 days. Because it had been off for awhile, I decided the first thing to do was to run a nozzle check. The nozzle check pattern turned out perfect, no need for me to initiate a cleaning cycle. However, the approximately 3 minute delay the printer took (complete with pumping, whirring, idle moments, then more whirring sounds) took me by surprise. It seemed to me that the P600 had initiated a preemptive cleaning cycle before the actual nozzle check. I was certain no cleaning cycle had been accidentally initiated by me. So, I decided to run another nozzle check just to see if the print time would become more reasonable. Again, a three minute print time, and an increasing sense that there might be a firmware bug, initiating a cleaning cycle when all I had called for was a nozzle check. Was I just imagining these stealth cleaning cycles each time I had initiated a nozzle check only? Three facts support my conclusion that stealth cleaning cycles were taking place.
1) The ink levels dropped noticeably (about 5% and easily noticeable on the graphic ink level indicators) with just two nozzle checks. A printed nozzle check pattern itself uses only negligible ink volume.
2) Approximately three minutes (I’m being conservative on the time estimate) to print a quick plain paper nozzle check pattern seemed excessive.
3) Using the Usage History feature to print out a Page Usage History Sheet before and after the second nozzle check showed 8 pages or an “A4 equivalent” page count of 37 pages had been printed.
Next, I double checked the page count behavior by printing just one plain page with a little text on it. The Usage history reported a new total page count and an “A4 equivalent” pages count incrementing the values just one page apiece, as would be appropriate.
This morning, I started the printer up again after being off for about 12 hours. I ran a nozzle check. Today, more Murphy’s Law. it worked entirely as one would expect, taking about 10 seconds to pressurize the lines and another 20 seconds to print the nozzle check pattern. I repeated the procedure again, and again a proper nozzle check and no stealth cleaning cycles. Page Usage history checked out correctly as well.
Clearly, I needed to better understand this preemptive cleaning that the P600 can initiate by itself (or not) in advance of a requested nozzle check. So, I called Epson technical support and after two hours of extensive conversation and escalated support (i.e, more knowledgeable support staff were asked to advise on my issue), here’s my best understanding of the situation for now:
According to Epson support:
1) Yes, the P600 does have an “auto cleaning” sensing feature not discussed in the User’s Guide. It will auto initiate a cleaning cycle if it somehow detects one might be needed. The feature is not user selectable, i.e., it can’t be turned off by the end user, hence, no mention in the user manual.
2) According to Epson, the sensing technology and the printer itself is not generally affected by low relative humidity in the printing environment. However, I note that yesterday, my print lab was fairly dry, 25-28%RH, when I was unable to print a nozzle check without triggering an unwanted stealth cleaning cycle. Today, my print lab is more moderate at 38-40%RH, and I was able to perform two normally behaving nozzle checks this morning.
3) Epson support doesn’t think the auto sensing function should have initiated the second cleaning cycle/nozzle check yesterday after the first nozzle check showed a perfect pattern. Epson believes there may be a problem with my unit’s auto cleaning sensor.
4) Epson is replacing my unit with another brand new one. It should arrive next week.
Epson support was very courteous, very professional, and graciously offered to replace my unit at Epson’s expense. That’s great, but I’m still very puzzled. My P600 has made nothing but great prints so far, no banding whatsoever. Moreover, the unwanted cleaning cycles have only occurred when I initiated a nozzle check. Hence, I really don’t know what to make of this odd behavior, but it’s certainly consuming a lot of ink. There may be a humidity or temperature sensitive issue, not with the heads, but with the auto clean sensing system (Epson wouldn’t say how it works) in my printer.
I have accepted Epson’s offer for a brand new replacement (it’s not a refurb because the first printer is less than 30 days old). I’m going to take some time this weekend to deliberately drop the humidity level on this first unit, and see if I can repeat the problem. I will have to tent the unit and add a desiccant because we are now getting out of the dry winter season here in Lee, Massachusetts. If I can once again induce the auto cleaning cycle with a low humidity event or some other yet to be determine method, then I will repeat the experiment again with the replacement printer once it arrives next week. I’m just not convinced right now that this problem has been sorted correctly. It will take more time and experimentation.
April 23, 2015: New Printer received, 11 8×10″ equivalent prints made.
The replacement printer from Epson was received on April 20, 2015. I installed it and have so far printed 11 8×10 inch equivalent size photographic images over a period of three days. “Equivalent” means I may not always be printing an 8×10 inch full bleed image. Sometimes, for example, I printed a couple of 5×7 inch images two up on a letter-size sheet for a total of 70 sq. inches ink coverage, but I am measuring the actual square inches of total image area printed. I have set up an Excel spread sheet to track every page and image size being printed, along with notes about actual page usage, clogging and cleaning events, media type used, when new ink cartridges are installed, etc.
Suffice to say, every time I accumulate 80 square inches of image area printed, my spreadsheet calculates the number of equivalent 8×10″ prints had all the image area printed conformed to a perfect 8×10 inch print with no borders. More about this aspect of the project later.
Before setting up the new printer, I did run the low humidity experiment I described earlier on the older printer before retuning it. That test failed to initiate another auto cleaning cycle on the first printer. The replacement printer subsequently initiated an auto clean cycle after the 6th 8×10 equivalent print two days after the initial install. It did so before printing the seventh print, and the sixth print had occurred only a couple of hours earlier. I had not performed a nozzle check or any other activity that could account for the printer’s automatic decision to perform a self-cleaning cycle!
My tentative conclusion at this point is that there was probably nothing wrong with the first printer. Auto cleaning cycles seem to be the nature of the P600, and neither managing room temperature and humidity levels nor printing frequently is going to guarantee that the printer will not periodically initiate an auto cleaning cycle. The auto clean feature may be triggered by other factors like air bubbles or other contaminants in the ink delivery system. It appears to be almost entirely outside the scope of the end user to manage how much cleaning will occur, save perhaps to gang print lots of images right in a row as often as possible. This is really not a likely scenario for most P600 owners except perhaps semi-pros that do event shooting where many prints can often be made in one printing session.
All that said, my immediate concern over the auto clean feature of the P600 must now be tempered by a pragmatic reality. One needs to look at the overall printer operating costs as time goes by to decide whether the printer is or isn’t ultimately going to be an economical printer for the typical amateur or semipro photographer. To be fair to Epson, this evaluation requires that I just run the printer and track my total cost of ownership as the months go by and as the printer produces more and more excellent quality prints. I promise to do that, and I promise to report back when I’ve got some solid data to share. Print # 12 has just been cued up to the printer ;-).
May 15, 2015: Samples of Epson Watercolor Textured (EWT) and Hahnemuhle Photo Rag Pearl Now in Light Fade Testing.
During the last few weeks I prepared samples of both media using my Epson 3880 and then repeating for the P600. To make the print output as precisely matched as possible, I built custom profiles using ProfileMaker 5.0.10 (with Logo Colorful setting chosen as the perceptual rendering algorithm) and then measured with my GretagMacbeth Spectroscan. I used the vendors’ recommendations for the chosen media settings (“Ultra Premium Luster” for the HNPhRagPearl on both printers, “Watercolor Textured” for the P600/EWT combination and “Watercolor radiant white” for the 3880/EWT combination. Ink Density controls were at default settings.
Consistent with earlier findings, the P600 Dmax values were notably better than those obtained for the Epson 3880. Here are the maximum printed black density readings measured on the samples that went into test:
P600/HNPHRagPearl/5760 dpi: Dmax = 2.20 L*min = 5.7
Epson 3880/HNPHRagPearl/2880 dpi: Dmax = 1.85 L*min = 12.0
P600/EWT/5760 dpi: Dmax = 1.70 L*min = 15.5
Epson 3880/EWT/2880 dpi: Dmax = 1.60 L*min = 18.0
When comparing tone and color, the overall print quality differences are indeed very subtle. The biggest differences, of course, could be seen in the darkest image areas, not so much in the various color patches, but also in the dot pattern screening smoothness and resolution between the corresponding highest quality resolution and finest detai settings used on both printers. Yet again, the resolution differences are very subtle. Also, the newly announced P800 17 inch model would be the more appropriate model to compare to the 3880, because it doesn’t have the P600’s higher 5760 dpi setting, topping out at 2880 dpi like the 3880. Thus, anyone with an Epson 3880 in good working order would have very little compelling reason to upgrade to a new P600 or P800 with the newer Ultrachrome HD ink set, unless better lightfastness proves to be a compelling reason for some users. This remains to be seen, and hence the AaI&A light fastness tests are now underway.
Curiosity then got the better of me. I was curious to compare the Ultrachrome HD color gamut to my Canon iPF8300’s LuciaEX output. It’s not an entirely fair comparison, of course, because the iPF8300 is a 12 ink system employing additional inks for red/orange, green, and blue/violet. One would expect the color gamut to be improved. It was, and it was quite noticeable for both media. Having gone that far, I decided to also add a pair of iPF8300 sample prints on these two media into the light fade testing (with custom profiles made in exactly the same way). So, now we have three very closely matched pairs of Hahnemuhle Photo Rag Pearl and Epson Watercolor Textured paper all running side-by-side on the same light fade test unit. The reference measurements (i.e., exposure = zero Megalux hours) have been made, and the first fade measurements will be made mid-summer at the 10 megalux hour exposure mark, but given the fact that these samples all use relatively stable pigmented inks, I expect we are going to need to get to the 20 megalux hour mark or more before the trends start to emerge. That will be in early fall.
I am now officially over budget, but I thought it may prove very instructive to have the Lucia EX inks in side-by-side testing as well.
May 20, 2015: Some Remarks about the 13 inch Canon Pixma Pro-1 Printer.
Today I decided to double down on comparative testing of the Canon LUCIA pigmented inks versus Epson’s new Ultrachrome HD ink set. I just ordered a 13 inch Canon Pro-1 printer. The 12 color ink set of the Pro-1 is a variant of the LUCIA EX set used in the iPF x300 and x400 series printers. It drops the green and blue inks and replaces those channels with a gloss optimizer cartridge and a third gray ink cartridge (for an impressive four levels of gray/black shades when used in combination with an “on the fly” choice between PK/MK inks, i.e., no ink wasting from PK/MK channel swapping which is still required on the new Epson printer models).
The Canon Pro-1 model has been on the market for about four years, but no word on a replacement model yet. New models to replace the Pro-10 and Pro-100 models have just been announced (the Pro-10s and Pro-100S). These updated models are relatively unchanged. They only appear to add more “Cloud connectivity” which I personally consider to be largely irrelevant for serious printmakers, especially given that the Pro-10 and Pro-100 already have wi-fi connectivity. The Pro-1 model does not have wi-fi, so adding wi-fi to a newer version might be an attractive feature to some users, but it remains to be seen if Canon plans to make any new improvements to the print head and/or ink technology at this time. I’m betting a Pro-1 replacement model will still use the same ink set, but it’s just a hunch, I have no “insider” information. Although I do appreciate wi-fi connectivity for smaller desktop printers, I can easily live with the Pro-1’s ethernet and USB connections.
The Pro-1 has received largely outstanding reviews, but it has always been the most expensive 13 inch model on the market owing to the sophisticated 12 channel ink set and tank-like pro level build quality. The excellent price I paid today for a new Pro-1 was to too hard to resist, and I am keen to compare its output directly to the P600.
That’s it for now. Look for more information added to Part II of the P600 project soon.
Cheers,
Mark H. McCormick-Goodhart
Director, Aardenburg Imaging and Archives

